THE
INTEGRATED ENERGY SYSTEM
The Optimum Electrical Power System
for the Cruising Sailboat
©
1989 Tor Pinney - All Rights Reserved
When
a sailor forsakes dockside shore power for the wild blue yonder
of the cruising world, his vessel becomes a self-sufficient
living environment. It has to produce whatever energy is
required to operate the various electrical and electronic
accessories aboard. This entails periodically recharging the
ship's storage batteries. Most sailors accomplish this by
running the engine to drive the stock alternator. Boats with
refrigeration, whether 12-volt or mechanical, run engines as
much as two hours every day to keep the fridge and batteries
topped off. To the long distance or liveaboard sailor, this
translates into considerable fuel consumption and engine wear
over the years. Running a large diesel engine without sufficient
load on it will shorten its useful life, not to mention the
noise it creates.
Ah,
but there are better ways, alternatives to this common,
inefficient method of deriving ship's electrical energy from
running the ship's main propulsion engine. The energy we need is
available from the sun, wind, and water, and from more efficient
fossil-fueled engines. When combined in an integrated energy
system, these contemporary sources can relieve the engine of
double duty as a generator by providing 12-volt power for
operating on board equipment, including refrigeration.
An
"integrated energy system" for the cruising sailboat
is simply a monitored combination of equipment that produces,
stores, and distributes ample 12-volt, DC electricity to meet
the needs of the vessel. The four components of this optimum
yacht electrical power system are the sources, the storage
batteries, the distribution, and the monitors.
12-Volt
Energy Sources
Solar
Panels
The
most fundamental, readily available source of energy on Earth is
the sun. The photovoltaic cell is an effective method for
converting solar light energy into electrical energy. Multiple
photocells (or solar cells) are laminated onto sheets of
paper-thin stainless steel (for marine-grade solar panels) and
sealed with a clear, protective coating of space-age polymers to
form solar panels. Flat, lightweight, and durable, many of
today's solar panels are well suited to use aboard boats.
There's
a place and a need for one or more solar panels on nearly every
cruising sailboat. Their function is to continuously and
silently recharge the ship's batteries during hours of sunlight.
For a vessel with minimal electrical gadgetry, located in a
sunny region, this "trickle charge" may be all that's
needed to keep batteries topped off. It's a valuable, virtually
maintenance-free source of energy in an integrated energy
system.
Solar
panels are available today with either rigid or flexible
housings. Rigid panels are marketed by a host of companies.
They're usually between ½ and 1½ inches thick and come framed
in many rectangular sizes, the handiest being anywhere from one
to three feet wide, and from two to four feet long. On a boat,
they can be screwed flat on any clear deck area or cabin top.
They'll often need a bit of shimming to compensate for camber in
the deck.
However,
solar panels are most efficient when they're angled to face the
sun directly. So it's a good idea to mount them in a manner that
enables you to adjust the direction they face. At anchor, you
could simply lean and lash a panel wherever it will get the most
direct sunlight. But it's probably a better idea to gimbal-mount
panels permanently so that they can pivot and/or tilt to
optimize their angle to the sun. Stern rail mounting
accomplishes this easily. Installing reflectors to direct more
sunlight onto the panel surface can enhance solar panel
performance.
Flexible
solar panels offer even more possibilities for sensible
installations on a sailboat. They come in a variety of sizes
ranging from one to eight square feet. Their chief advantage
over rigid panels is their ability to mount smoothly on curved
or flexible surfaces such as a cabin trunk, a cambered deck, or
a Bimini top. They're lightweight and quite thin - about ¼ inch
- so they're never in the way. Best of all, they can drape over
a curved dodger top or lash, snap or zip onto a sun awning. So
while you're making shade, you're also making electricity. On
the down side, flexible panels may not be as efficient than
their rigid counterparts. Check the rated watts when comparing
solar panels' output.
The
amount of electricity a solar panel produces depends primarily
on the size of the panel and the directness of the sunlight
striking it. Manufacturers tend to advertise absolute maximum
amperage output of their products based on perfect, controlled
conditions where blazing, unobstructed, perpendicular sunrays
strike flat panels. The amperage output is then measured right
at the panel.
In
real life, however, the sky is rarely cloudless, nor the sun at
maximum strength and declination. Rigging and spars will
sometimes cast shadows, decreasing a panel's output. Also, on
board a boat the electricity must travel some distance through
wiring and diodes before it trickles into the battery, further
reducing amperage received. So when a panel is rated for, say, 3
amps (about 36 watts), it will actually yield a net average of
1.5 to 2.5 amps during the brightest part of the day. If a panel
yields 2 amps for 5 hours a day, the batteries have absorbed 10
amp-hours - enough to play the radio and power your cabin lights
that evening.
If
you wire several panels together in series, the power output is
multiplied. A boat in Florida was seen to have eight 33-watt
flexible solar panels mounted on the sun awning. That's 8 panels
X 2 amps (approximate average output) = 16 amps X 5 (bright sun)
hours per day = about 80 amp hours. That's enough amps to power
a hefty 12-volt cold-plate refrigerator/freezer.
Wiring
solar panels is simple. The wires pass inside the boat through a
watertight fitting available at most marine stores. Some solar
panels have a built in diode, a device that allows current to
flow in one direction only. If yours doesn't, then solder a
diode in series in either wire somewhere before the positive and
negative wires connect to the corresponding battery bus
terminals. A Schottky diode is recommended because of its low
voltage drop. This will prevent batteries discharging through
the panels after dark. For safety, you should install both an in
line fuse and an on-off switch between the solar panel and the
distribution panel. You can wire in an ammeter to monitor the
amount of solar energy flowing into your batteries.
Prices
for marine-grade solar panels vary among. Larger panels cost
proportionally more than smaller ones. Expect to pay $300 to
$500 or more for 1 ft. x 4 ft., 40-watt rigid panels, and as
little as around $100 for small sizes that produce one amp or
less.
Wind
Generators
Harnessing
the wind is nothing new to a sailor! With a wind generator, you
can convert wind's kinetic energy into DC current for
around-the-clock battery charging. Of course, this is a more
productive energy source in regions of steady breezes, such as
the trade wind belt.
A
wind generator is a DC generator driven by a propeller. When the
wind spins the prop fast enough, the unit produces a trickle
charge ranging from an amp or two, up to 10 or 15 amps,
depending on wind speed and the propeller and generator size. A
full-size ship's wind generator in the Virgin Islands, where the
trade winds maintain a steady 15-knots much of the time, can
easily produce 6 or 7 amps continuously, well over 100 amp-hours
per day. That's enough to power radios, lights, radar,
television, and a 12-volt refrigerator/freezer!
Beware
of manufacturers' spec sheets that promise amperage output in
very light (5- to 7- knot) breezes. The measurements are taken
at the generator output terminal and only indicate what a
virtually "dead" battery might absorb in these wind
conditions. For DC current to be accepted and stored, the source
voltage must be higher than the voltage in the receiving
battery. A wind generator may well be generating current in
light airs, but at only 9, 10 or 11 volts. So no amps will go
into a battery that's only partially discharged to, say, 12
volts - which is the typical on board scenario - and no charging
will occur. Most of the large-bladed wind generators don't
actually do much charging until the wind exceeds 10 knots. The
small bladed, European style units need a good deal more wind
than that to produce energy.
The
popular American manufactured wind generators feature two- or
three-blade propellers with diameters of four to five feet.
These are hefty generators with relatively good light air
performance. Some European designs are smaller in size, weight,
and blade diameter, with multiple-bladed props. These are less
productive in light breezes, but unlike the large models, they
can be left running in very high wind conditions.
There
are several ways to mount a wind generator on a sailboat. It can
be hoisted into the foretriangle area by a jib halyard while at
anchor, positioned by guys. This allows the unit to pivot and
track wind shifts. But it must be taken down and stowed
somewhere every time you want to get underway, so this
installation is more practical aboard a vessel that tends to
remain anchored for long periods of time. Some skippers mount
their wind generator permanently on the forward side of a
mizzenmast, which eliminates the set-up and tear-down hassle,
but will not allow the wind generator to pivot or face anything
but a head wind. A bow pulpit mount is also rigid, with the
added disadvantages of being vulnerable to damage and dangerous
to crew.
The
most effective solution is mounting on a pole. A pole mounted
wind generator, normally located at the stern, can pivot to face
any wind shift as your boat sails back and forth at anchor or
lies to a current. Best of all, it's always in position to
operate, even under sail! When sailing close hauled, a stern
pole-mounted unit is especially well powered, getting strong
apparent wind funneled into it by the mainsail. The ability to
operate underway makes the pole mount most valuable to cruising
sailors, who need to keep their batteries charged during long
offshore passages. Though this increases the boat's windage
somewhat, it's not enough to matter to a sailboat loaded for
cruising. A further development of the pole mount arrangement is
the bi-pole rig. Looking something like a football goal post on
the stern of the boat, one pole supports the wind generator; the
other, a radar dome or antennae dish. The horizontal crossbar
between the two lends structural support. It's also a handy
place to mount antennae, such as loran and sat nav, where
masthead height isn't imperative. Or you can mount two wind
generators and double the charge. The structure is stiffened by
struts running from each pole to the boat's rail, either fore or
aft, and by one post-to-post diagonal bar that creates the
triangulation necessary for absolute strength on the athwartship
plane.
Pole
mounts are generally custom made and must be very sturdy. The
installation is often strongest if stepped through the deck onto
a block or plate secured to the hull below. With a little
planning, pole mount assemblies can be engineered to disassemble
by unbolting. This will be necessary for boats whose cruising
itinerary includes the canals of Europe, for example, where
masts are unstepped and the vessel's height clearance becomes
critical. Poles (or bi-poles) can be either stainless steel, or
schedule 40 aluminum, the latter being lighter and less
expensive.
A
word of caution: The spinning blade of a wind generator
propeller can be very dangerous when mounted within reach.
Brightly painted or reflective blade tips make the blade more
noticeable to crewmembers.
Many
wind generators come with some kind of over-speed governing
device or brake to protect the unit against damage in very high
winds. Otherwise, they must be manually shut down. In
preparation for extreme wind conditions, they should be taken
down altogether. Generally, they should not be left running when
the boat is unattended for long periods. It may be worthwhile to
wire your wind generator through a regulator to prevent
overcharging of the batteries. Also, they need a diode, either
installed in line or built into the unit itself, to prevent
battery discharge in calm winds.
Wind
generators, especially the larger units, create some noise and
vibration. In moderate conditions, it's a whooshing sound that
passes as unnoticed background noise. In high winds, it's often
a louder fluttering, chopping, whirring noise. Some pole-mounted
wind generators shudder momentarily when they pivot to track an
apparent wind shift, though a new generation of balanced epoxy
props has eliminated this vibration on at least one popular
brand, the Windbugger. Maintenance on wind generators is
minimal. Wooden propeller blades need occasional painting.
Periodically, the brushes and bearings in the generator need
replacing, just as in an automobile alternator. But for the most
part, wind generators just keep on working, night and day, to
keep your ship's batteries charged. After the initial cost of
purchase, usually ranging from $800 to $1100, your ship's
electrical energy is as free as the wind.
Water
Generators
Water
generators can be a valuable addition to the cruising sailor's
integrated energy system. They are the least common alternate
energy source, perhaps because of the inevitable drag created by
towing that extra propeller in the water - 25 to 35 lbs. at 6
knots of boat speed. Or perhaps it's because most boats spend
the majority of their time in anchorages rather than under sail.
A
water generator is a DC generator activated by a propeller towed
in the water. The prop is allowed to freewheel when the boat is
underway. There are four basic ways to set this up, and then
there are variations of these: (1) by trailing a propeller
astern on a cable or braided line. The passing water spins the
prop, which twists the cable and the cable turns the generator
mounted on the stern rail. On some models the prop is attached
to the generator and a cable tows the entire unit; (2) by
mounting a style of water generator that looks like a small
outboard motor. Its lower gear case and propeller are submerged.
(3) By installing a dedicated propeller shaft through the hull
of your boat, letting it freewheel when sailing to turn the
generator. (4) By connecting a generator by way of a belt,
bicycle chain, or gear drive to the ship's main prop shaft and
allowing that to freewheel when sailing.
The
trailing portion of the first, towed type may be damaged or
taken by large fish. The latter two options require custom
design and installation.
Many
wind generators readily convert to water generators, propelled
by the cable and prop method. In fact, wind and water generators
are much the same in terms of cost and maintenance, being the
same machine with different drives. Because the fluid coupling
between water and propeller is much greater than between wind
and propeller, water propulsion yields about double the amps per
knot of speed, generating about 5 amps at 6 knots of boat speed.
To get the same 5 amps from the wind requires about a 12-knot
breeze. For a sailboat making an ocean passage, running down the
trades at 6 knots plus, there's an extra 120 daily amp hours for
the taking! On a cloudy day, on a dead run with little apparent
wind, when the solar and wind energy just isn't coming through,
the water generator will run everything aboard as long as you
keep sailing.
Like
the wind generator, the water generator can be shut off when
your batteries are topped off. Or it can be wired through a
regulator, eliminating this requirement.
Generators
and alternators are very similar machines. Both produce DC
current for charging batteries. Generators are more rugged than
alternators; alternators are the more efficient of the two. If
you'd like to build your own wind or water generator from an
ordinary alternator, the book, The 12-Volt Doctor's Practical
Handbook by Ed Beyn (Spa Creek Instruments, Annapolis, MD),
describes how to do it.
Engine
Alternators
The
alternate energy sources we've discussed so far are all
important ingredients in the integrated energy system. They will
greatly reduce, if not entirely eliminate, the need to run the
engine in order to charge batteries. But the main engine's
alternator can and should be a ready source of electrical
energy, particularly when you're running the engine to propel
the boat anyway.
Most
marine diesel engines come standard with too small an alternator
to cope with the large capacity battery bank of the liveaboard
cruising sailboat. It may well be that with solar, wind, and
water energy sources, you often won't need more than a small
alternator. But in harbor conditions of overcast skies and light
winds, the alternator becomes your only means of recharging the
batteries away from the dock. So a more efficient system is
worth considering.
For
years now we've been hearing about switches that enable us to
manually over-ride the alternator's regulator for quick-charging
the batteries. One of the functions the regulator is to control
the voltage output of the alternator or generator by regulating
the current in the field coil. This eliminates the risk of
overcharging and perhaps destroying the battery. When you
over-ride this function, the alternator can pump full charge
into the batteries without automatically tapering off as the
battery becomes charged.
A
variable rheostat can replace this on-off switch, allowing you
to increase or decrease the field current and, therefore, the
charging rate. But this system requires constant monitoring. You
can damage your alternator by overheating it. The chief danger,
however, is that you only have to forget just once to switch
back to automatic regulation and your batteries will be boiled
and permanently damaged. That's a pretty stiff penalty to pay!
Even with an automatic shut-off wired in, the variable rheostat
is, at best, an old fashioned, partial solution in our quest for
more efficient battery charging. There is an optimum charging
curve which demands precisely decreasing current at specific
battery levels during the charging cycle. Human control, even
devoting full attention during the process, is going to be less
than perfect.
Today's
solution is solid state electronics and high output alternators
with self-governing regulators, such as the series made by
Balmar Products of Seattle, Washington. These units measure the
condition of each battery and automatically regulate charge
according to the ideal charging curve, a more efficient and much
safer alternative to the old manual control methods.
Mounting
a non-standard regulator may require some minor customizing of
the engine brackets. It's possible that the increased side load
on the fan belt may cause bearings to wear rapidly. Before
increasing the size of your alternator, consult the engine
manufacturer for approval.
When
you upgrade your boat's alternator, leave the original unit
mounted in place, if possible, to facilitate a temporary
switchover if the big one ever fails. Otherwise, clean the old
one, spray it thoroughly with light oil, wrap it in plastic, and
store it away in a dry locker. It is always wise for a cruising
sailboat to carry a spare alternator, as well as replacement
brushes and bearings for both units aboard.
The
Power Charger
If
you need more battery charge than you're getting from the sun,
wind, and water generators, there is a diesel powered
alternative to running the engine. Balmar Products markets the
Power Charger, comprised of a four-horsepower Yanmar diesel
engine that drives a large (100-amp or 140-amp) Balmar
alternator. It's compact, weighs just 65 lbs. and burns only a
pint of diesel fuel per hour. For boats with large power
consumption devices like DC refrigeration and microwave oven,
the Power Charger may be a valuable part of an integrated, ample
charging system. From the spare pulley provided, you could drive
a mechanical refrigerator compressor at the same time, or a
scuba compressor, or auxiliary, large capacity water pump for a
deck wash and/or emergency bilge pump. Balmar offers an optional
water desalinator that runs off this unit, producing 20 gallons
of fresh water per hour while you charge your batteries and
fridge!
Installation
isn't too difficult, but the Power Charger really needs a water
cooled (and muffled) exhaust system to be tolerable, not the dry
exhaust offered as standard. Until a water-cooled exhaust system
is made available, installing one yourself is a complex custom
job.
AC
Power Sources
While
a 12-volt DC electrical system satisfies most of the needs of
most cruising boats, there are certainly occasions when 120-volt
AC power is desirable. It's handy for operating hand tools such
as drills and saber saws, galley appliances such as microwave
ovens, blenders, and coffee makers. On large boats the
conveniences of air conditioning, washers, dryers and water
makers may be considered important. Here's an overview of
several different ways to obtain 120-volt AC power aboard your
boat.
Besides
shore power, which of course is restricted to dockside use,
there are four basic ways to have AC power aboard a sailboat:
(1) Carry a portable gasoline or diesel AC generator or install
a heavy duty gen-set; (2) Install an inverter to make AC power
from your ship's DC batteries; (3) Install an engine driven AC
generator; (4) Install an AC electric generator powered by the
ship's DC batteries. A fifth type, seldom if ever seen on boats,
is the emergency standby generator system that operates on LPG
or LNG. Manufactured by Winco in 5,000- and 8,000-watt models,
prices are about $3,400 and $4,100, available from the Hamilton
Ferris Company.
Before
buying, make a detailed list of all electrical appliances aboard
and the number of watts consumed. Include lights stereos, TV's,
hair dryers, tools, air conditioning and so on. Electric motors
(circular saws, air compressors) may require up to five times
their normal operating wattage during start-up; this is called
surge and must be factored into your calculations. List normal
watts and surge watts separately. Though you probably won't run
all appliances at the same time, the power rating of your AC
source (inverter, gen-set, and so on) should exceed by a safe
margin the number of watts you expect to use.
Portable
Generators and Gen Sets
For
many small boat cruisers, fossil-fueled portable generators
provide all the intermittent AC required. Numerous manufacturers
such as Honda, Yamaha, Tanaka and Nissan sell small, lightweight
(20 pounds and up) and inexpensive ($350 and up) generators to
the RV market. Yanmar makes a line of portable diesel
generators, starting at two kilowatts and 127 pounds. While most
are not made of marine-grade materials, common-sense maintenance
and weather protection enable them to survive at sea for many
years. The units stow handily in cockpit lockers. They are
perhaps most useful for powering hand tools and as emergency
back-ups for battery charging.
Larger
boats with electric stoves, air conditioning and other luxury
appliances have little choice but to permanently install a gen-set.
Because electrical equipment in the United States is designed to
operate with a fixed frequency of 60 Hz, the frequency output of
the generator must be fixed at 1200, 1800, or 3600 rpm. The
slower-turning engines are quieter but heavier than the
fast-turning models. The 1800-rpm, four-pole set is a good
compromise for many boats. It makes sense to use the same fuel
(gas or diesel) and exhaust type (air- or water-cooled) as the
main engine.
In
most boats the gen-set may be mounted in the engine room. In any
case, it must be ventilated, sealed from the living cabins,
convenient for fuel and raw-water hook-ups, and mounted on
sturdy structural members. Unless you're very knowledgeable
about such installations, this is a job best left to
professionals. Many of the major manufacturers, including
Norther Lights, Onan, Kohler, Westerbeke and Medalist Universal
Motors, publish useful manuals to help size, select, install and
maintain their products.
Inverters
An
inverter is an electrical device that changes DC from the ship's
batteries to AC and boosts voltage from 12 to 120. Unlike some
older models, the sophisticated modern inverter, such as the
Heart Interface Power Inverter, produces a smooth sine wave
suitable for running TV's and computers. It is a good method of
obtaining intermittent AC power, but of course it is limited by
the capacity of the battery bank - the more ampere-hours in the
bank, the longer the inverter can be run. Unlike the generator,
it is not a power source, but simply a means of changing
electrical current from one form to another. Some principal
manufacturers are Balmar, Dytek, Heart, IMI/Kenyon and Trace;
prices range from about $100 (for a small 100-watt model) to
$2,500 (for a powerful 2,000-watt model with battery charger).
Optional add-ons increase usefulness and cost. A power inverter
is a convenient addition to the integrated energy system on a
cruising boat. And best of all, it doesn't rely on fossil fuels.
Engine-Driven
AC Generators
While
a gen-set is merely an AC generator directly geared to an
internal combustion engine, the engine-driven AC generator just
uses the main engine instead of an auxiliary, dedicated one.
Engine-driven AC generators such as those made by Auto-Gen mount
on or near the main propulsion engine and are driven by belts
and pulleys. Therefore, AC power is available whenever the
engine is run. Auto-Gen's units are available from 2.5 kilowatts
to 6.5 kilowatts and cost from about $2,000 to $2,700.
AC
Electric Generators
Like
an inverter, the AC electric generator "makes" AC from
DC, but not by the same means. The AC electric generator uses
battery power to run a small electric motor, which then turns
the generator. Honeywell is one of several manufacturers; its
units produce from 500 to 1,600 watts. Again, such a device is
limited by the ampere-hour capacity of the battery bank.
There
is no single "right" product for cruising boats. Just
as an integration of two or more 12-volt solar, wind and water
generators helps to meet the varying conditions found under way
and at anchor, a combination of AC power sources offers
versatility. For example, if the gen-set is operated only when
the main engine is shut off, an inverter or engine-driven AC
generator can provide AC under way. It really depends on the
number and type of appliances installed aboard your boat, and
how you use them.
Shore
Power
Many
cruising sailors spend as little time as possible dockside.
Nevertheless, we may at times tie up and plug in the
"umbilical cord," so shore power should figure into
our ship's integrated energy system.
For
our purposes, the 125-volt, AC electricity brought aboard
through the dockside power cable needs to be converted or
rectified into Direct Current at 12 volts. In many countries and
throughout Europe, a boat wired for American voltage will need a
220/110 step-down voltage transformer to avail itself of shore
power. This current can then charge the boat's batteries to
supply all our electrical needs while we're plugged in.
What's
called for here is a marine AC converter/battery charger. This
differs from an ordinary automotive battery charger in two
important ways: (1) The design ensures electrical isolation
between the 125- volt AC circuit and the battery circuit, which
prevents stray currents that pose shock hazards aboard a boat
and could set up corrosive electricity in the surrounding water,
and (2) The converter produces a non-trickle type charge
delivery, which avoids the risk of damaging batteries by
overcharging. The marine charger automatically shuts itself off
when batteries are fully charged, and switches itself back on
when battery voltage drops.
Remember
to shut down any alternate energy sources, like solar and wind,
which aren't self-regulating. Overcharging batteries is one of
the quickest ways to destroy them!
Storage
Batteries
Batteries
are the heart of the integrated energy system. Because the
living environment of a boat requires relatively low amperage
doled out over a long period of time, we use "deep
cycle" batteries - batteries designed for gradual discharge
- to power our lights, radios, and so on. Deep cycle batteries
are built more heavily than standard batteries, which are
designed to deliver lots of amps in brief bursts such as for
starting an engine.
The
first consideration for the battery bank in a successful energy
system is its capacity. To some extent, capacity is determined
by how much space, weight and money we can afford. Most stock
boats do not have enough battery capacity for liveaboard
cruising. As a rule of thumb, the ship's batteries should be
able to supply nominal electrical energy for four 24-hour days
of live-aboard consumption without recharging.
To
compute how much energy you typically consume, see the Sidebar
"Typical Loads For Accessories". For each item,
multiply the amperage it consumes by the number of hours you use
that device per day to give you the ampere-hours (amp-hours)
drawn. For example, you may burn the anchor light for 11 hours
per night. It draws 1.2 amps. So the consumption is 13.2
amp-hours (1.2 amps X 11 hours). You might play the stereo for a
few hours in the evening: 1 amp x 3 hours = 3 amp-hours. Total
up all the amp-hours you've calculated, and you have your
approximate daily electrical energy consumption. Consider that
your usage is quite different during offshore passages, where
running lights, radar, and navigational devices are operating
for long periods. Depending on your cruising style, you might
average this in. Now, multiply the total daily amp-hours times
four. If your batteries can deliver this total without requiring
recharging, you've got an adequate battery bank aboard.
Batteries
cannot deliver their rated capacity. To do so would drain them
"flat", and that's a sure way to shorten the life of a
lead-acid battery. It is healthiest for batteries to be
recharged once they've reached their 50% capacity. The 50%
discharge point of deep cycle, 12-volt batteries is 12.2 volts.
We monitor this from an accurate voltmeter. But even 50% is too
much to expect, because our batteries are not always charged to
capacity. In fact, after normal charging, they're only at about
85%. So, in order to limit discharge to the 50% level, we have
just 35% of the rated capacity of our bank available for use
without recharging (85% charged - 50% discharge level = 35%
available).
This
means we want our 4-day amp-hours to equal 35% of our batteries'
rated capacity. Let's assume a 50 amp-hour daily usage
aboard. That's 200 amp-hours for four days. This indicates a
battery bank rated for about 572 amp-hours (35% of 572 = 200.2),
requiring three or four large, deep cycle batteries. With this
kind of deep cycle battery capacity, there really isn't a need
for a separate, standard engine start battery.
Do
yourself a great favor and invest in top quality batteries.
Their price may be higher at purchase, but their cost will
ultimately be lower when averaged out over years of continued
use beyond the life span of cheaper brands - not to mention the
reliability factor.
Batteries
are best mounted low in the boat because they're so heavy and
can effect boat stability and trim. However, they must also sit
above high bilge-water levels. The less distance between energy
sources, batteries, and loads (distribution panel and
appliances), the better, because power is lost in long wires.
Batteries shouldn't be allowed to get very hot, as they will if
installed in most engine compartments. Heating will shorten
their life considerably. They need to be secured so that they
can't possibly come loose, even if the boat is turned upside
down and shaken. If they're lead-acid batteries, they need to be
in strong battery boxes that will catch any acid that leaks, and
they should be ventilated. Be sure the installation is readily
accessible for routine maintenance.
You
have the option of using pairs of 6-volt batteries, connected in
series, instead of single 12-volt batteries. These may be easier
to move around and install. There's the added advantage that if
one cell goes bad, ruining the battery, you only have to replace
half as much battery.
The
lead-acid battery is the most common 12-volt battery type. But
today there is an alternative: gel packed Dryfit Prevailer
batteries made by Sonnenschein Batteries (Cheshire,
Connecticut). They have several advantages over lead-acid
batteries: They cannot spill acid, they don't form dangerous
gases while charging, they're totally maintenance-free (never
needing water added), and, according to the manufacturer, they
can be discharged flat without harm. The only way to damage
these military-designed batteries is by overcharging them. In
size, weight, price, and longevity they're comparable to top
quality lead-acid batteries.
Typical
Loads for Accessories
Estimated
power consumption of some common on-board devices
DEVICE
AMPS*
Anchor
Light 1.2
Anchor Windlass 75.0
Autopilot 4.0
Bilge Blower 2.5
Bilge Pump 4.0
Cabin Fan 1.2
Cabin Light (incandescent) 1.5
CB Radio (receive) 1.0
Compass Light 0.1
Deck Wash Pump 10.0
Depth Sounder 0.1
Fluorescent Light 0.5
Forced Air Heater 7.0
Foredeck Light 1.7
Fresh Water Pump 8.0
Fuel Pump 3.0
Head Pump 18.0
Horn 3.0
Inverter 1.4
Knot meter 0.1
Loran 1.2
Masthead Tri-color 2.0
Microwave (via inverter) 95.0
Propane Electric Shut-Off 0.7
Radar 3.7
Recording Depth Sounder 0.5
Refrigeration (cycling) 25.0
Running Lights 3.5
Sat Nav (average) 0.3
Spreader Lights 6.0
Spotlight 10.0
Steaming Light 1.0
SSB Radio (receive) 2.0
SSB Radio (transmit) 25.0
Strobe Light 0.7
Tape Player 1.0
VHF Radio (receive) 0.3
VHF Radio (transmit) 4.5
Water Maker (small 12-volt) 3.6
Weather Fax 2.4
Wind Speed indicator 0.1
To
estimate the amperage draw of other 12-volt devices, divide
their rated watts by 12.
Distribution
If
the batteries are the heart of the integrated energy system,
then the distribution system is the brain. Distribution of
electricity aboard happens in two stages: First, source energy
is consigned to one or more of the batteries. Then the stored
energy in the batteries is directed to each device as needed.
Source
energy other than that of the alternator (i.e., current from
solar panels, wind and water generators, battery chargers) may
be channeled through switches enabling us manually to determine
the target battery, the battery to receive that charge. But
that's not necessary. Each of these trickle charges can simply
be wired directly to one specific battery. If, for example, we
have dedicated one battery to power a 12-volt refrigerator
compressor, usually the heaviest load aboard, we can expect this
battery to be depleted daily. It's going to need almost constant
replenishment of energy. If the wind generator is the most
consistent producer aboard, we can wire it to this refrigerator
battery (we'll call it battery #1). In breezy conditions, the
Windbugger will generate 100 amp-hours or more daily, enough to
keep Battery #1 topped off.
Now,
suppose the wind is up and the wind generator is cranking out a
steady 9 amps - over 200 amp hours in 24 hours. That's more than
the fridge battery can use. We'll want to share some of those
spare amps with other batteries. We could use some to top off
the reserve or starter battery (#2) if we've dedicated one, or
to supplement the "house" bank (#3). This is done
through a pair of master battery selector switches, through
which we can connect the #1 with #2, or #1 with #3, or #2 with
#3 (see Wiring Diagram). Electricity will flow from whichever
bank has the higher voltage to the bank that has the lower
voltage. Like water, voltage seeks its own level. Therefore,
soon after two batteries are connected through the switch,
they'll level off at the mean voltage. In our example we'll
connect the wind-charged fridge battery (#1) to the house bank
(#3). First they'll level off. Then, as the wind generator's
trickle charge enters Battery #1, half of it will bleed over to
#3, keeping them both charged to the same level.
Conversely,
when the refrigerator compressor cycles on while #1 and #3 are
connected, then it will be drawing from both batteries
simultaneously. There are times when this may be desirable. The
main thing is that we are in control.
The
one energy source that ought to be "automatic" is the
alternator. This can and should be self-distributing as well as
self-regulating. By wiring the alternator through isolators, its
charge is directed to all batteries. A dual isolator enables you
to charge 2 separate battery banks simultaneously. A pair of
dual isolators charges 4 banks, regardless of the battery
selector switch positions. The isolators determine which
batteries need how much of the charge, and distribute the
alternator's amperage output accordingly. So if the house bank
is low when you fire up the engine, but the refrigerator battery
is well charged from alternate sources, then the alternator will
jam maximum amps into the hungry #3 battery, while sending only
a trickle to #1. Finally, as all batteries approach a charged
condition, the self-regulating alternator gradually reduces its
output to zero.
Once
energy is directed to and stored in the batteries, it can then
travel to the ship's electrical panel, stage two of the
distribution system. The modern panel includes rows of breaker
switches, each one labeled for its load device. A word of
warning: Many panels have AC and DC on the same board, albeit in
separate rows. If you're ever poking around behind such a panel
while plugged into shore power, and accidentally cross an AC
terminal with a DC terminal with your screwdriver, a massive
dose of electricity may be instantly distributed into you, or,
through the negative grounded engine, into the surrounding
water. Someone could get electrocuted! All 120-volt AC breaker
panels should be physically separated from 12-volt DC panels.
They rarely are, so be careful!
Many
boat manufacturers locate the electrical panel in the nav
station. Frankly, there are more useful things - navigational
electronics, radios, etc. - that deserve this prime space.
Panels can be placed in almost any convenient spot away from
possible spray from hatches; the nearer to the batteries, the
better.
From
the panel, myriad wires run throughout the boat to the
appliances. They should be color coded and recorded in diagram
form for future reference. Neat, tie-wrapped bundles of wire,
well secured to bulkheads along their route, are the mark of a
professional installation. Most devices call for an in-line fuse
of proper amperage, a smart precaution even if the panel's
breakers perform the same protective function. In general,
unless you're especially well versed in wiring, you should hire,
or at least consult, a professional marine electrician regarding
wire sizes, insulation, connections, diodes, fuses, switches,
and safety precautions. Faulty or improper wiring is a prime
cause of fires on boats.
|
|
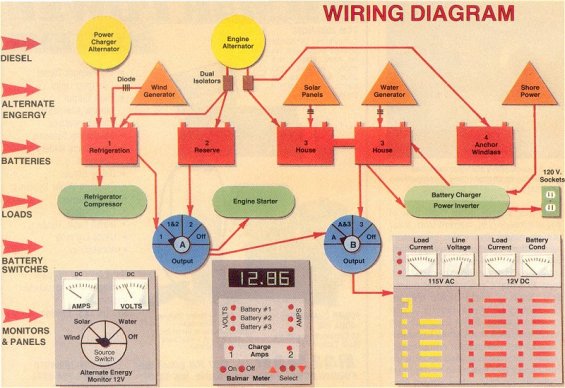
From
Top Left
A
Power Charger will guarantee ample, efficient
recharging for the #1 (refrigerator) battery and,
through the switches, the #2 and #3 banks as well.
The wind generator also feeds directly to Battery
#1.
The
main engine's large alternator charges all battery
banks, each according to need, distributed by a pair
of dual isolators.
Battery
#2 is a reserve battery. It sometimes functions as
an engine starter battery, and sometimes as a second
refrigerator battery, as determined by the switches'
positions.
Solar
and water generators feed the #3 (house) battery
bank. This house bank, which is shown as a pair of
12-volt batteries in parallel, also receives the
battery charger's input when shore power is
available. When shore power is disconnected, the
power inverter can supply 120-volt AC to the ship's
electrical sockets, drawing 12-0volt current from
the #3 bank.
The
#4 battery is dedicated to an electric anchor
windlass. It is mounted far from the rest of the
system, requiring long wire runs. For this reason,
and since it normally is used with the engine
running, Battery #4 is only charged by the engine
alternator and cannot interact with the other banks
through the switches, as can Batteries #1, #2 and
#3.
The
Switches
The
system requires two four-position battery switches.
Switch A receives Batteries #1 and #2. The output of
this switch is used for engine starting. If Switch A
is pointing to #1, then that battery will be called
upon to start the engine (#1 is already feeding the
refrigerator directly). The 1&2 setting combines
these two batteries in parallel, for boosting the
refrigerator battery's capacity, or for engine
starting with two batteries. Set to #2 alone, it
uses the reserve battery for starting.
The
output of Switch A also goes to the A-terminal on
Switch B. Switch B is also wired to the #3 battery
bank. In the middle (A&3) position, Switch B
connects the #3 bank with whatever Switch A is set
to. So, if Switch A is set on #1, and Switch B is
set on A&3, then battery banks #1 and #3 are
connected. This would be a useful setting when shore
power is connected, enabling the battery charger's
charge to flow into #3, then onward into #1 to keep
the refrigerator battery topped off as well as the
house bank. Output of Switch B goes to the
distribution panel.
Monitors
The
alternate energy monitor illustrated uses a pair of
meters - a DC amp meter and a DC voltmeter - to
monitor three alternate energy sources. The meters
display the output of whichever source the
four-position switch is set to: wind generator,
solar panels, or water generator.
The
Balmar digital meter displays the precise voltage of
any one of three battery banks. It also displays the
number of amperes flowing into or out of each
battery, and how many amps are being produced by
either of two sources (one source normally being the
engine's alternator).
The
distribution panel shown also houses four meters:
120-volt
AC Load Current - how many amps of AC we are
consuming
120-volt AC Line Voltage - how much AC voltage is
being supplied
12-volt DC Load Current - the total DC amps we are
using
12-volt DC Battery Condition - approximate battery
voltage level
|
Monitors
and Controls
The
monitors are the eyes of the integrated energy system. By
observing how much current passes in and out of the system, and
how much we have stored, we can more effectively control and
conserve electricity aboard. We can also protect the system from
damage due to negligence.
Monitors,
for our purposes, are meters. There are two basic types we can
use: analog (needle-in-a-window) meters; and the newer,
extremely accurate, solid state digital meters with LCD
readouts. The latter are the better choice where accuracy is
desired, such as observing battery voltage.
Monitoring
the incoming source energy can be accomplished with simple
needle meters. One AC voltmeter can display shore power when
we're plugged in dockside and an AC ammeter will indicate how
much load we're putting on the AC system. This will help us
avoid overloading the 30-amp circuit that moderate-size
sailboats commonly use. Away from the dock, the same AC meters
will indicate voltage provided by, and amps drawn from the power
inverter, if we've installed one.
We
want to know how much energy our alternate sources are
providing. DC volt meters, wired to the solar, wind, and water
generators, illustrate at what point these units are developing
enough voltage to start pumping amps into the batteries. Even
more useful are DC ammeters. Wired to the source generators,
they register how many amps each unit is producing. Knowing
this, we can easily judge whether these sources are keeping pace
with our consumption, and which ones are helping the most at
what times. A single voltmeter and a single amp meter can
monitor all three alternate energy sources one at a time if you
wire in a three-way switch to each meter.
Similarly,
one analog voltmeter can monitor all the batteries if a switch
is wired in line to connect the meter with each battery
separately, one at a time. An off position in the switch will
conserve power, avoiding the inevitable small draw of a meter in
constant operation. One DC ammeter should monitor the total
amperage consumption aboard.
It's
imperative that we watch the batteries closely. Neglecting them
will surely result in damage. We need to know when our batteries
reach the 50% discharge point (12.2 volts) to avoid deep-cycle
discharge, which shortens battery life. Conversely, we must
guard against overcharging that can ruin a battery.
The
old fashioned way to determine lead-acid battery condition is by
measuring the specific gravity of the sulfuric acid and water
electrolyte with a hydrometer, a glass tube with a calibrated
float inside and a rubber suction bulb on top. This is still a
good gauge for identifying a bad cell. But the measurement is
affected by temperature variations, making it a less than
perfect means of determining voltage. An accurate voltmeter is
needed for this. In the analog meter category, an
"expanded-scale suppressed-zero" meter is the best
choice. It ignores voltages below 10 or 11, because a battery is
completely dead and depleted of useful charge at that point
anyway. Instead, this meter's scale makes it easier to read
exact fractions of volts by only displaying levels between, say,
11 and 16.
The
most accurate meters are the digital models. Balmar makes one of
the best. It will display the voltage level of three separate
batteries (measured to the 100th of a volt!), and the amperage
passing in and out of each. It also monitors the amperage output
of two energy sources, one normally being the alternator. The
selector button lets us choose what information is displayed on
the LCD screen. With this monitor system, it's easy to check the
voltage of each battery with a glance, several times daily. We
can also see instantly whether a battery is gaining or losing
amps, as loads that are consuming power compete with sources
putting energy back in.
As
you get used to making quick, regular surveys of your ship's
energy components, you will find your confidence increasing with
your ability to monitor and control your integrated energy
system.
Summary
Today,
more and more sailors are extending their cruising range and,
correspondingly, the length of time that their boats must
provide a complete living environment. Electrical energy systems
aboard small and mid-size sailboats have come a long way to keep
pace with the growing demand for civilized amenities afloat. We
can have for our convenience, our comfort, and our safety ample
12-volt and 120-volt power for all normal marine and household
uses. An integrated energy system will provide it continuously
and efficiently. More power to you!
~
End ~
Back
to List of Tor's Tips
